
| 일 | 월 | 화 | 수 | 목 | 금 | 토 |
|---|---|---|---|---|---|---|
| 1 | 2 | 3 | 4 | 5 | ||
| 6 | 7 | 8 | 9 | 10 | 11 | 12 |
| 13 | 14 | 15 | 16 | 17 | 18 | 19 |
| 20 | 21 | 22 | 23 | 24 | 25 | 26 |
| 27 | 28 | 29 | 30 |
- Scaffold
- Flutter 앱 배포
- Image.network
- Row
- listview
- FutureBuilder
- Flutter 예제
- Networking
- Flutter Example
- Hello World
- Cached Image
- AppBar
- Flutter Tutorial
- Load Image
- node.js
- Flutter 강좌
- navigator
- ListTile
- InkWell
- Snackbar
- 반석천
- ListView.builder
- Column Widget
- HTTP
- CrossAxisAlignment
- MainAxisAlignment
- sqlite
- Row Widget
- WillPopScope
- flutter
- Today
- Total
꿈꾸는 시스템 디자이너
Flutter 강좌 - Use themes to share colors and font styles | 테마 사용법 본문
Flutter 강좌 - Use themes to share colors and font styles | 테마 사용법
독행소년 2019. 7. 1. 16:51Flutter 강좌 목록 : https://here4you.tistory.com/120
이번 강좌에서는 기본적인 테마(Theme)에 사용법에 대해서 알아본다.
소스코드는 다음과 같다.
import 'package:flutter/material.dart';
import 'package:flutter/foundation.dart';

void main() => runApp(MyApp());

class MyApp extends StatelessWidget {
  @override
  Widget build(BuildContext context) {
    final appName = 'Custom Themes';

    return MaterialApp(
      title: appName,
      // 테마 설정
      theme: ThemeData(
        // 밝기는 어둡게
        brightness: Brightness.dark,
        // Color의 색상의 배열값? 색의 농도를 의미하며 100부터 900까지 100단위로 설정 가능
        // 사용자와 상호작용하는 앨리먼트들의 기본 색상
        primaryColor: Colors.lightBlue[800],
        // 위젯을 위한 전경색상
        accentColor: Colors.cyan[600],
        // 사용할 폰트
        fontFamily: 'Montserrat',
        // 텍스트 테마 설정
        textTheme: TextTheme(
          headline: TextStyle(fontSize: 72.0, fontWeight: FontWeight.bold),
          title: TextStyle(fontSize: 36.0, fontStyle: FontStyle.italic),
          body1: TextStyle(fontSize: 14.0, fontFamily: 'Hind'),
        ),
      ),
      home: MyHomePage(title: appName),
    );
  }
}

class MyHomePage extends StatelessWidget {
  final String title;

  MyHomePage({Key key, @required this.title}) : super(key: key);

  @override
  Widget build(BuildContext context) {
    return Scaffold(
      appBar: AppBar(title: Text(title)),
      body: Center(
        child: Container(
          color: Theme.of(context).accentColor,
          child: Text(
            'Text with a backgournd color',
            style: Theme.of(context).textTheme.title,
          ),
        ),
      ),

      // 일반적인 플로팅액션버튼 생성 방법
      // 이 때 accentColor 값을 기본 테미값(Colors.cyan[600])으로 가진다.
      floatingActionButton: FloatingActionButton(
        onPressed: () {},
        child: Icon(Icons.add),
      ),

      // 플로팅액션버튼에 독자적인 테마를 이용하는 방법
      // 1. ThemeData를 새로 생성한다.
//        floatingActionButton: Theme(
//          data: ThemeData(
//            accentColor: Colors.red,
//          ),
//          child: FloatingActionButton(
//            onPressed: () {},
//            child: Icon(Icons.add),
//          ),
//        )

      // 2. 부모 테마를 상속하하여 재정의한다.
//      floatingActionButton: Theme(
//        data: Theme.of(context).copyWith(
//          colorScheme:
//              Theme.of(context).colorScheme.copyWith(secondary: Colors.yellow),
//        ),
//        child: FloatingActionButton(
//          onPressed: () {},
//          child: Icon(Icons.add),
//        ),
//      ),
      // end of Scaffold
    );
  }
}
소스를 살펴보면,
MyApp 클래스에서 title과 home을 설정하고 추가로 theme 항목을 설정하고 있다. 테마의 설정은 ThemeData 위젯을 통해 정의할 수 있다.
정의내용은 코드의 주석을 참고하면 쉽게 이해가 가능하다. 색상과 관련해서 다음의 사항을 이해하자.
- brightness: 스크린의 기본 배경색
- primaryColor: 사용자와 상호작용하는 앨리먼트의 기본 색상
- accentColor: 위젯을 위한 전경색
특히 생상을 설정할 때 '[]'를 이용해서 숫자를 입력하게 되는데 이는 해당 색상의 농도정도를 설정하는 것으로 100부터 900까지 100단위로 설정이 가능하며 클 수록 색상이 진해진다. Flutter 공식 문서를 보면 쉽게 이해가 가능하다.
https://api.flutter.dev/flutter/material/Colors-class.html
Colors class - material library - Dart API
Color and ColorSwatch constants which represent Material design's color palette. Instead of using an absolute color from these palettes, consider using Theme.of to obtain the local ThemeData structure, which exposes the colors selected for the current them
api.flutter.dev
초기 스크린에 해당하는 MyHomePage 클래스를 살펴보면 appBar와 body 그리고 floatingActionButton으로 구성된다. 실행화면은 다음과 같다.
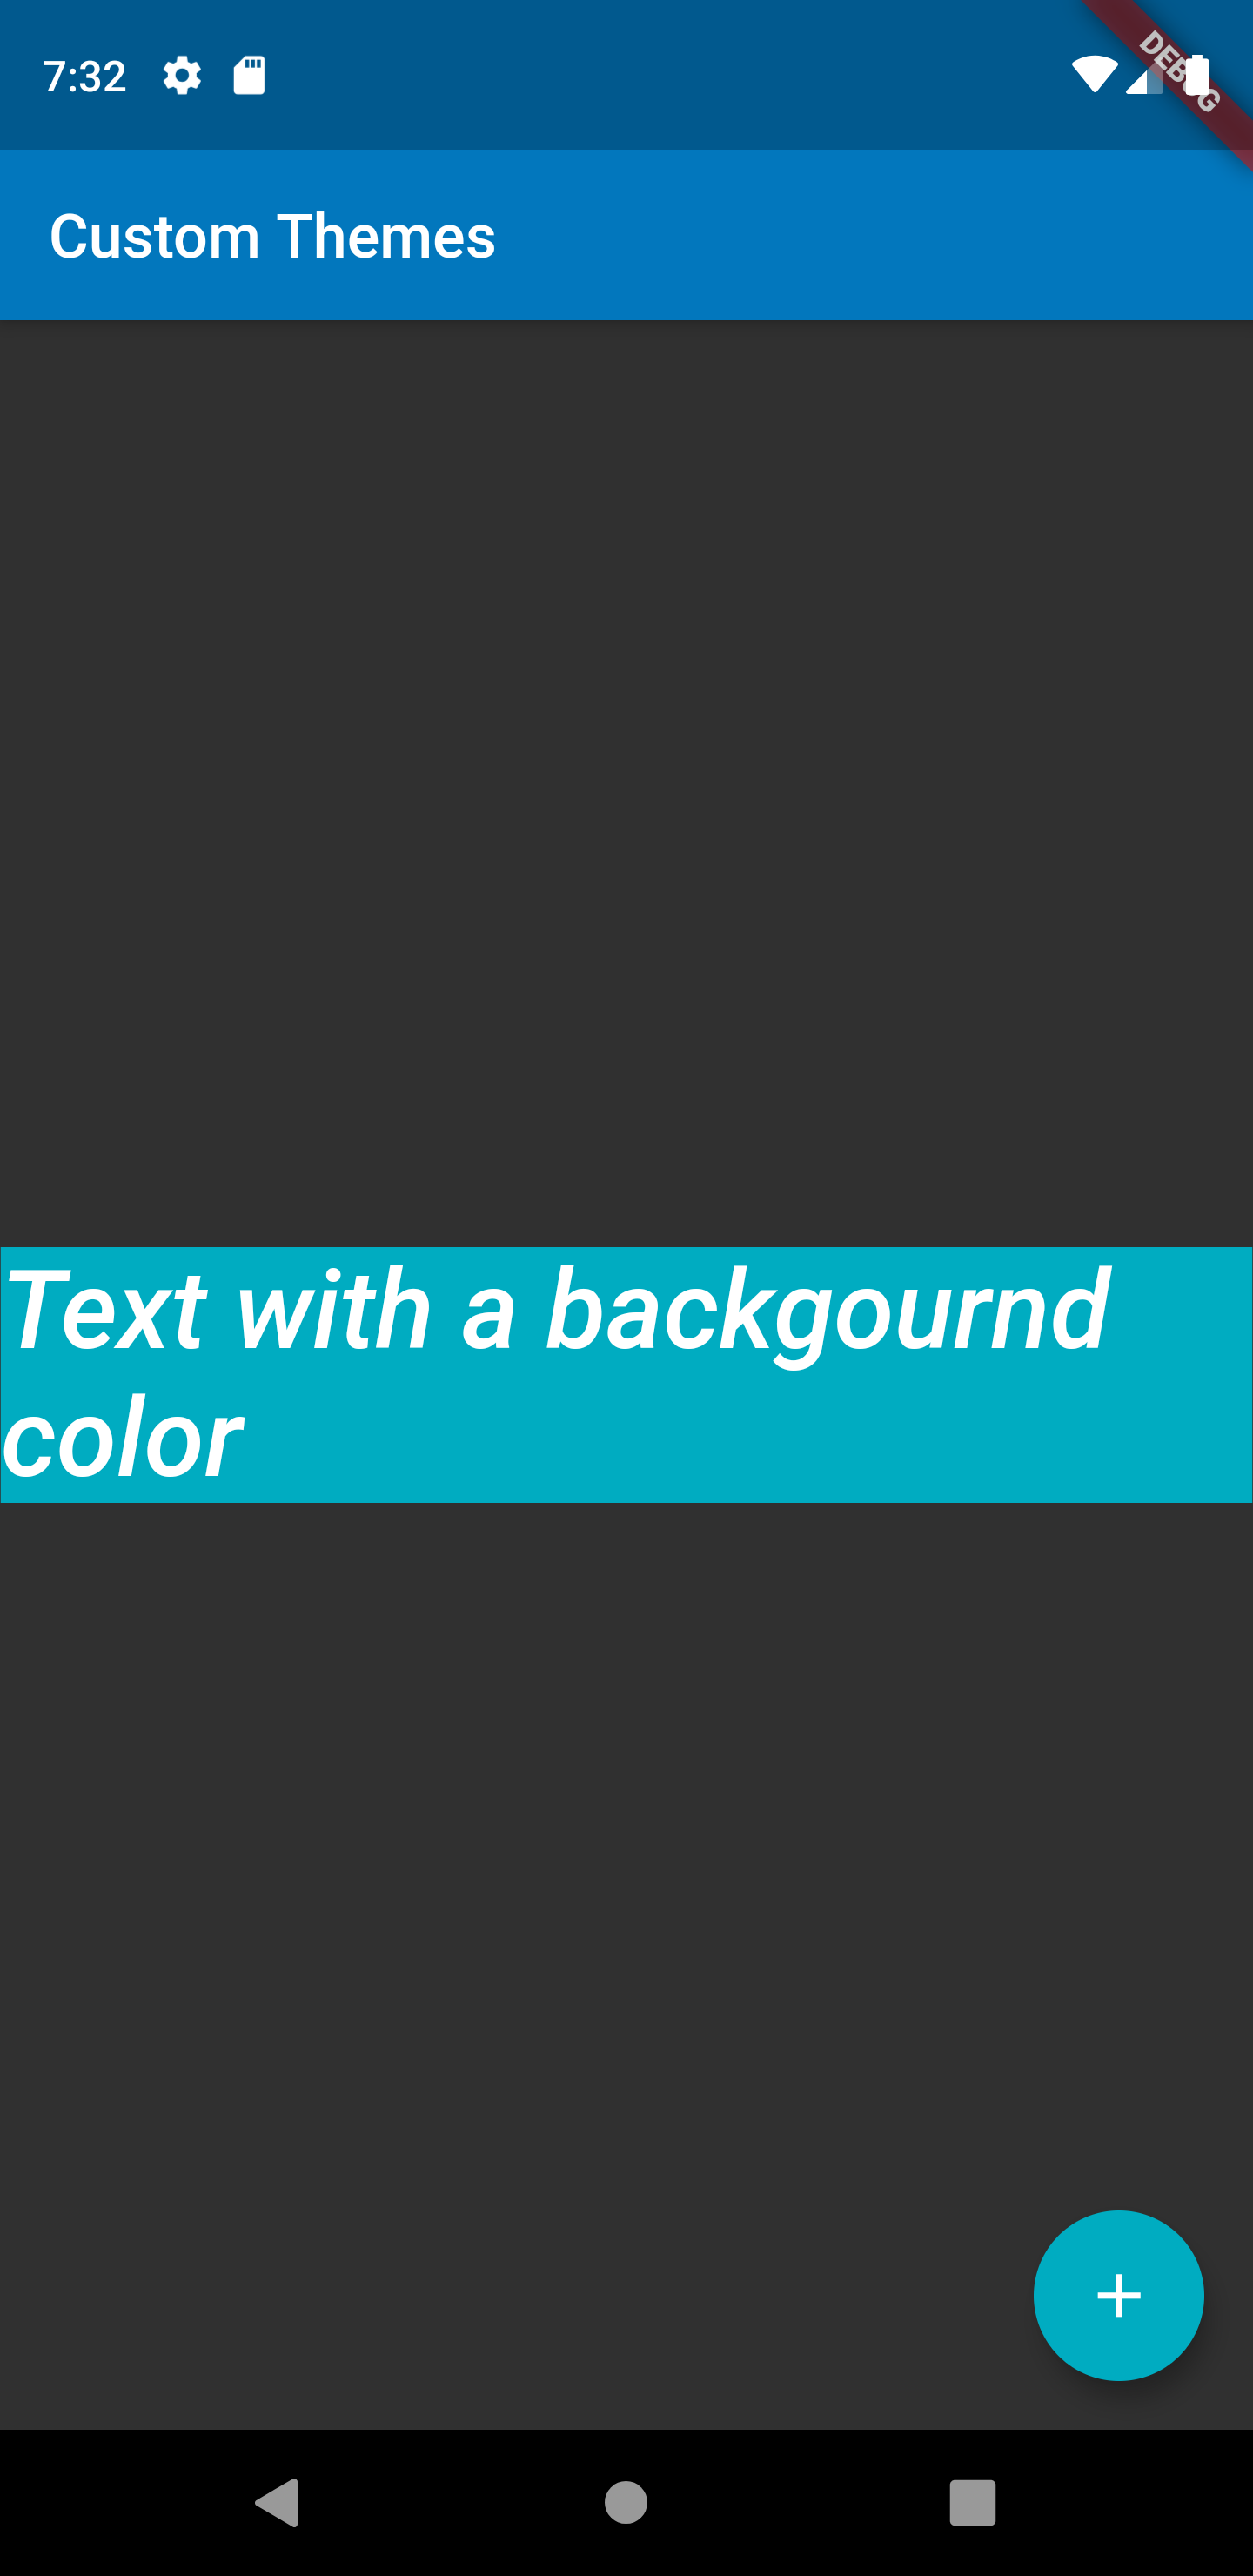
스크린의 배경색은 brightness 값이 반영되어 있고, appBar의 배경색은 primaryColor 값이 반영되어 있다. 마지막으로 컨테이너와 플로팅액션버튼은 accentColor 값이 설정되어 있는 것이 확인된다.
플로팅액션버큰의 색상은 기본적으로 Theme값의 accentColor 값이 반영되어 위의 그림처럼 표현된 것이다.
컨테이너 부분은 다음의 소스를 확인하자.
      body: Center(
        child: Container(
          color: Theme.of(context).accentColor,
          child: Text(
            'Text with a backgournd color',
            style: Theme.of(context).textTheme.title,
          ),
        ),
      ),
컨테이너의 color값을 명시적으로 accentColor 값을 부여하고 있다. 만약 color 값을 설정하지 않으면 기본값이 투명 값으로 출력된다. 즉 컨테이너의 색상을 accentColor 값을 이용하도록 하기 위해서는 위 코드와 같이 구현하면 된다.
만약 앱의 일부 영역(위젯)에 별도의 테마값을 설정하기 위해서는 해당 영역을 Theme 위젯으로 래핑하여 재정의하면 된다. 이 때 재정의 하는 방법은 다음과 같이 두가지 방법이 있다.
1. ThemeData를 재정의 한다.
floatingActionButton 부분을 다음과 같이 수정한다.
floatingActionButton: Theme(
data: ThemeData(
accentColor: Colors.red,
),
child: FloatingActionButton(
onPressed: () {},
child: Icon(Icons.add),
),
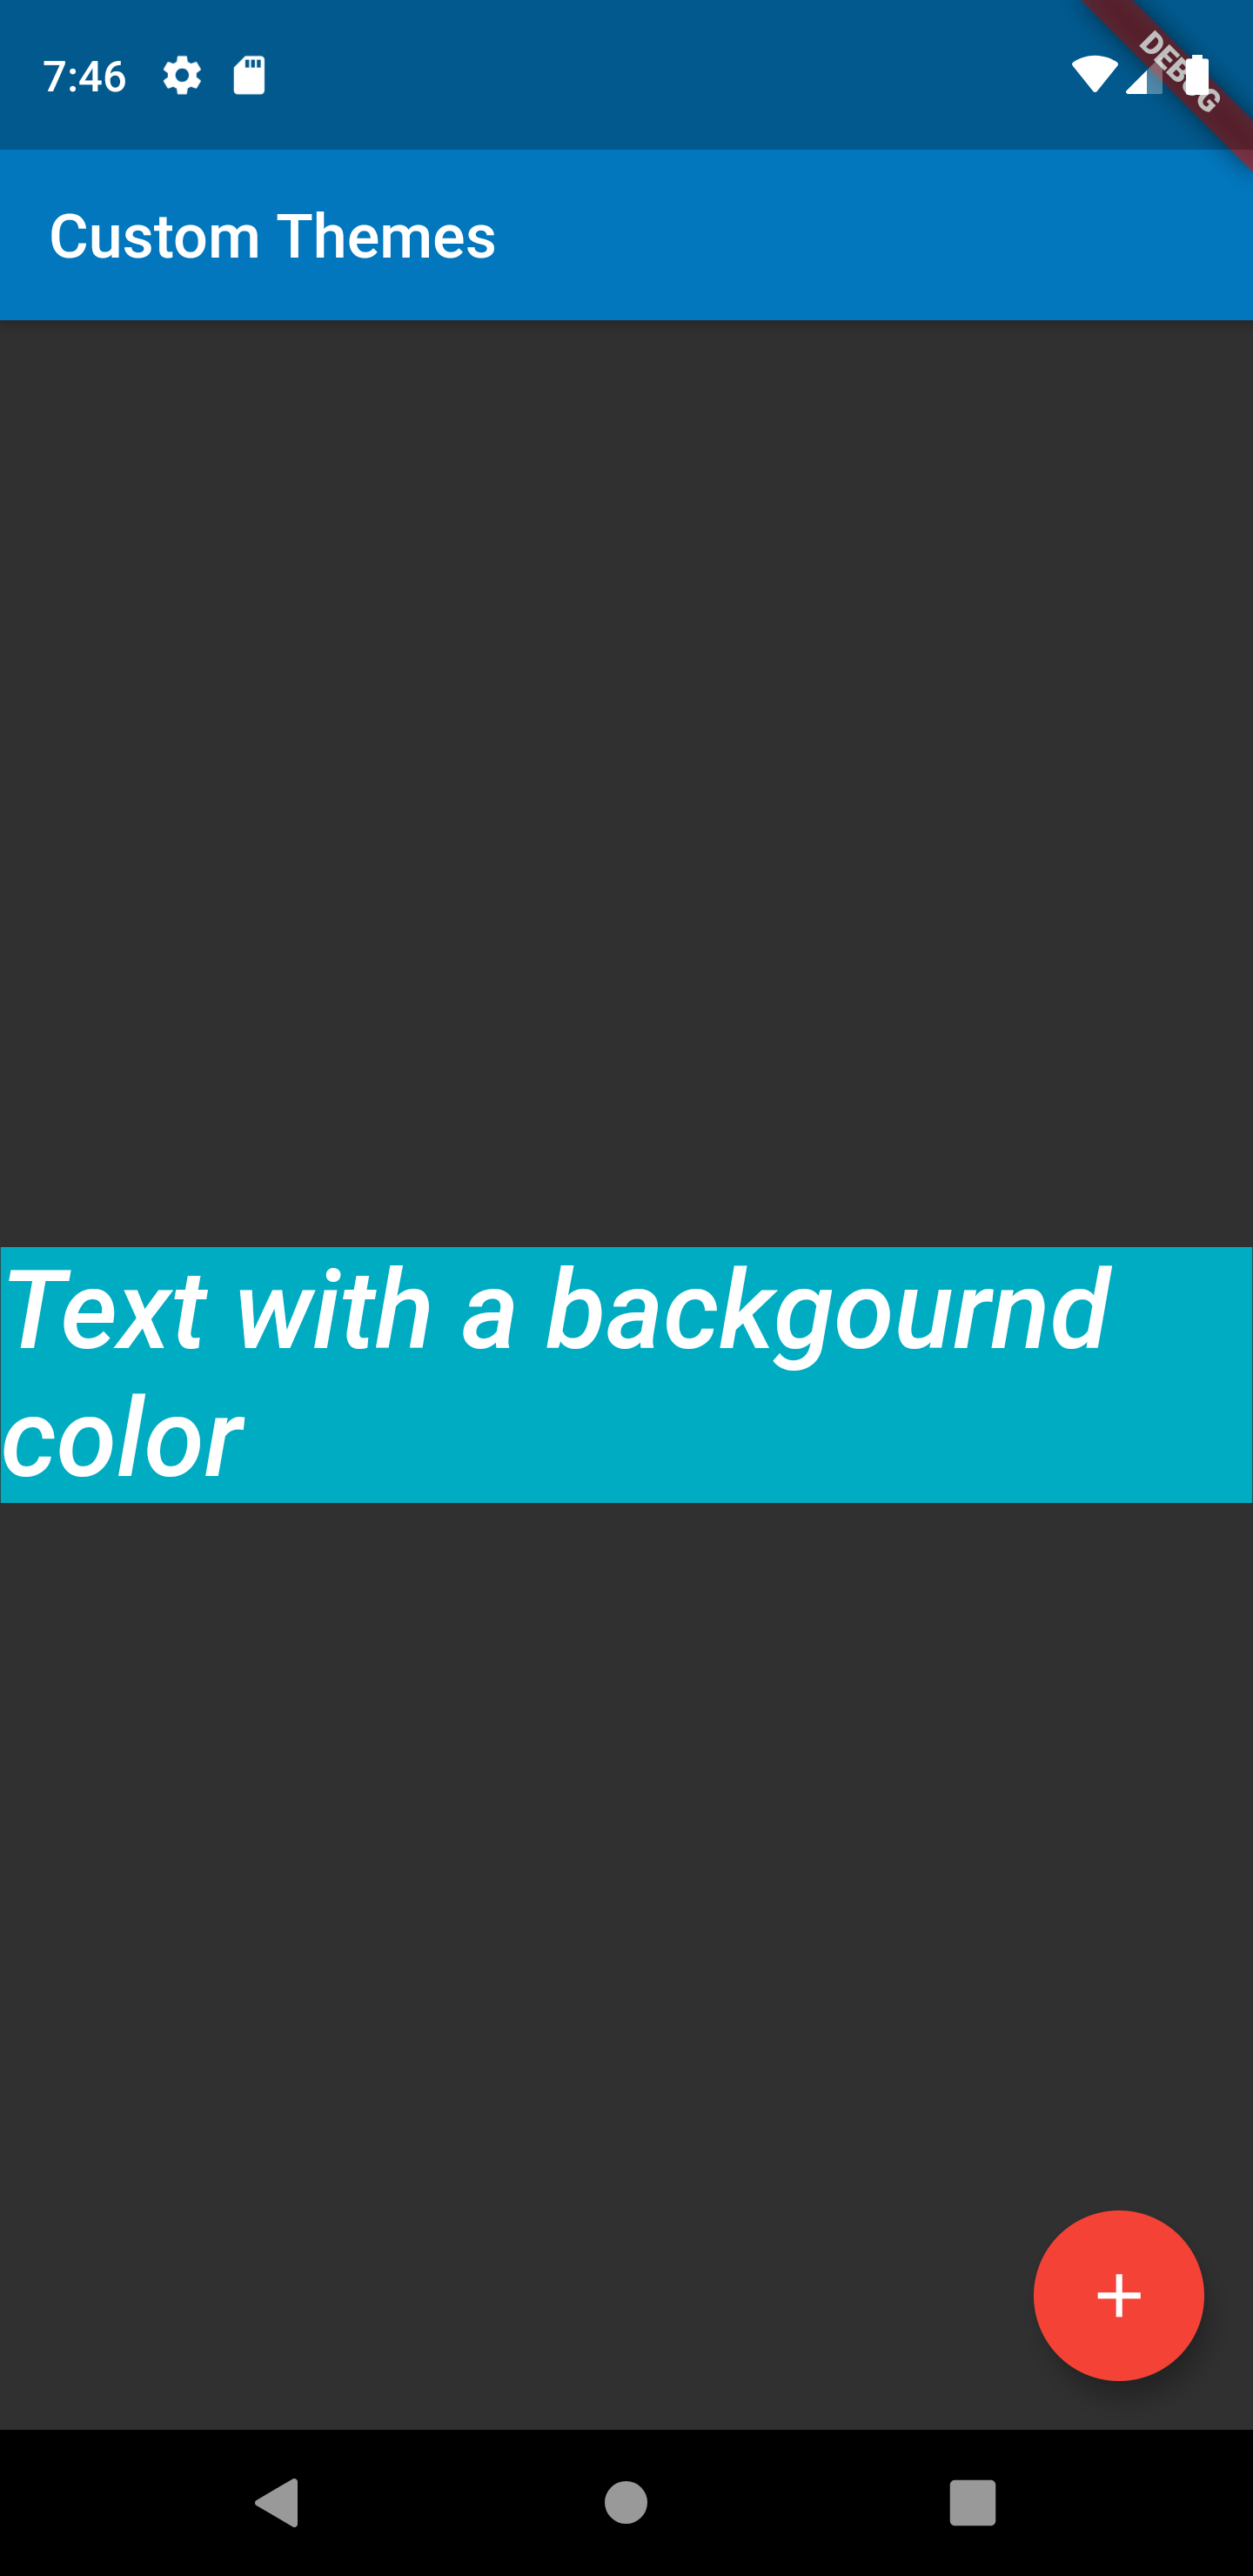
)앞서 설명한 것 처럼 floatingActionButton의 테마를 재정의 하기 위해 Theme 위젯으로 래핑한 후 data 항목을 ThemeData 위젯으로 재정의 한 것이다.
실행 화면은 다음과 같다. accentColor 값을 red로 재정의 한 모습으로 출력되는 것을 확인할 수 있다.
2. 부모 테마를 상속하여 재정의한다.
Theme 의 data값을 모두 재정의 하지 않고 부모 Theme값을 상속하면서 그대로 상속하면서 일부만 재정의 하고자 할때는 다음과 같이 구현이 가능하다.
floatingActionButton: Theme(
data: Theme.of(context).copyWith(
colorScheme:
Theme.of(context).colorScheme.copyWith(secondary: Colors.yellow),
),
child: FloatingActionButton(
onPressed: () {},
child: Icon(Icons.add),
),
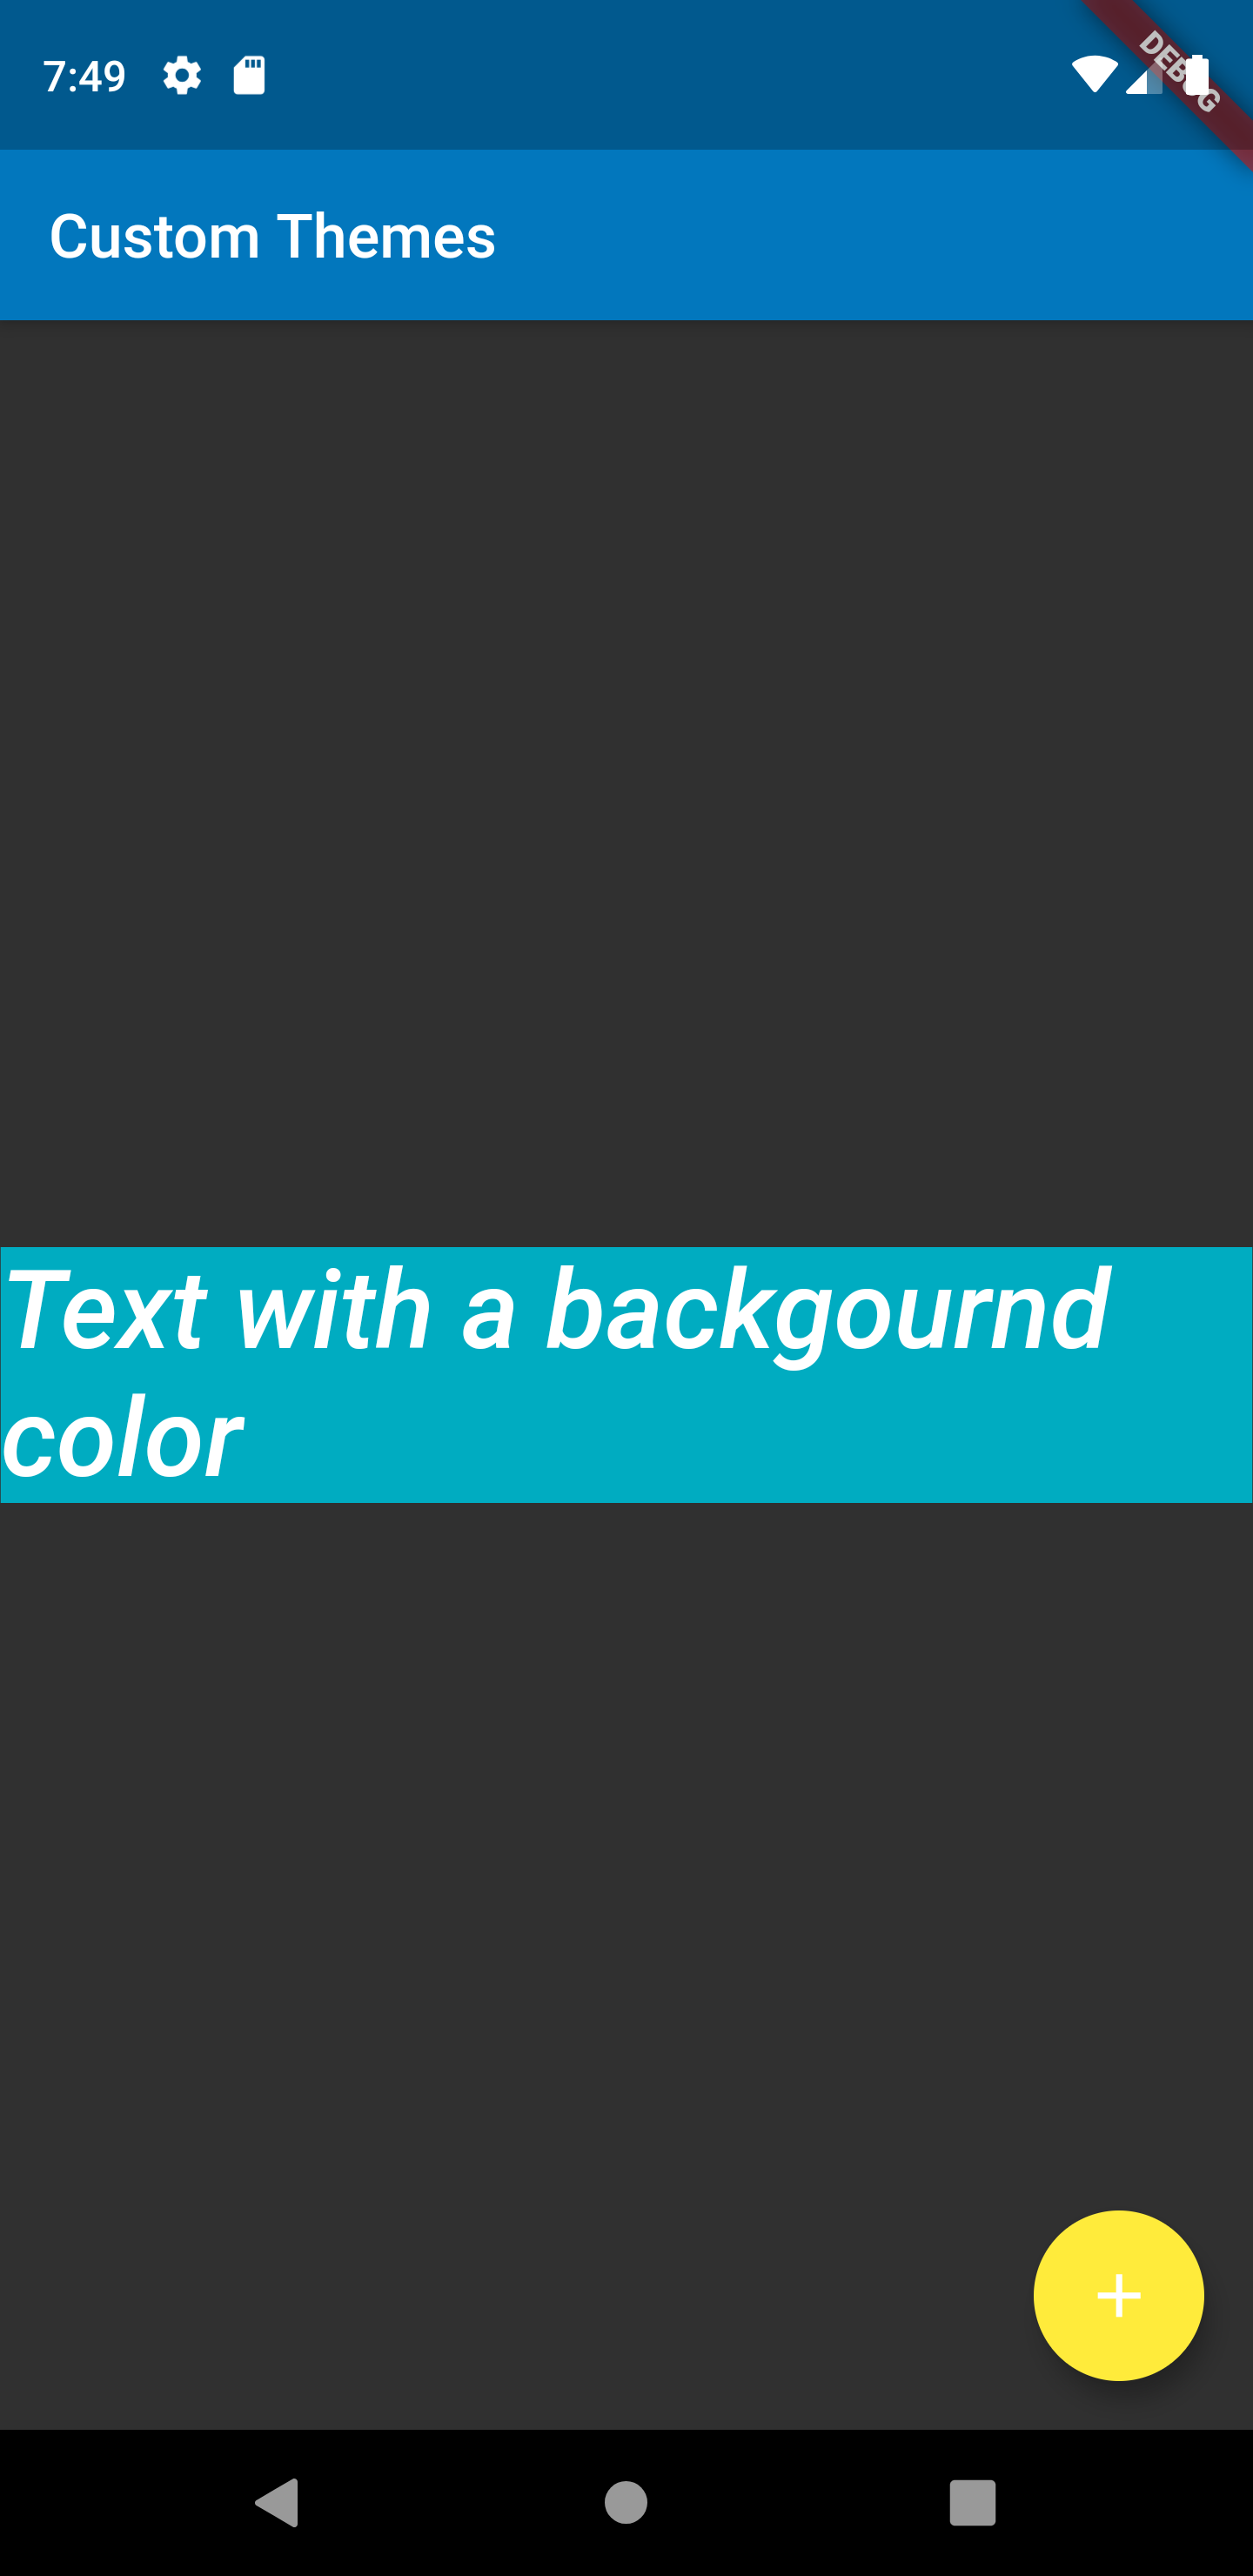
),Theme.of(context).copyWith() 함수를 이용하면 테마트리에서 현재 테마에서부터 부모 테마까지 추척이 가능해지며, 재정의도 가능하다.
실행화면은 다음과 같다. 플로팅액션버튼의 색상이 yellow로 재정의된 것을 확인할 수 있다.
본 강좌는 Flutter 공식 사이트의 문서를 참고하여 작성되었습니다.
https://flutter.dev/docs/cookbook/design/themes
Use themes to share colors and font styles
How to share colors and font styles throughout an app using Themes.
flutter.dev
Flutter Code Examples 강좌를 추천합니다.
- 제 블로그에서 Flutter Code Examples 프로젝트를 시작합니다.
- Flutter의 다양한 예제를 소스코드와 실행화면으로 제공합니다.
- 또한 모든 예제는 Flutter Code Examples 앱을 통해 테스트 가능합니다.
Flutter Code Examples 강좌로 메뉴로 이동
Flutter Code Examples 강좌 목록 페이지로 이동
Flutter Code Examples 앱 설치 | Google Play Store로 이동
Flutter Code Examples - Google Play 앱
Are you a beginner at Flutter? Check out the various features of Flutter through the demo. Source code for all demos is also provided.
play.google.com
'Development > Flutter' 카테고리의 다른 글
| Flutter 강좌 - 탭 사용법 | Work with tabs (2) | 2019.07.02 |
|---|---|
| Flutter 강좌 - 커스텀 폰트 사용법 | Use a custom font (0) | 2019.07.02 |
| Flutter 강좌 - Display a snackbar | 스낵바 사용법 (1) | 2019.07.01 |
| Flutter 강좌 목록 (2) | 2019.07.01 |
| Flutter 강좌 - Add a Drawer to a screen | 스크린에 드로워(서랍) 추가 (0) | 2019.07.01 |


