| 일 | 월 | 화 | 수 | 목 | 금 | 토 |
|---|---|---|---|---|---|---|
| 1 | 2 | 3 | ||||
| 4 | 5 | 6 | 7 | 8 | 9 | 10 |
| 11 | 12 | 13 | 14 | 15 | 16 | 17 |
| 18 | 19 | 20 | 21 | 22 | 23 | 24 |
| 25 | 26 | 27 | 28 | 29 | 30 | 31 |
- Flutter 앱 배포
- Flutter 강좌
- Flutter Example
- listview
- navigator
- Row Widget
- Hello World
- FutureBuilder
- AppBar
- Flutter 예제
- WillPopScope
- flutter
- Snackbar
- Cached Image
- Load Image
- MainAxisAlignment
- Networking
- node.js
- InkWell
- ListView.builder
- 반석천
- HTTP
- Flutter Tutorial
- Row
- Scaffold
- ListTile
- CrossAxisAlignment
- Image.network
- sqlite
- Column Widget
- Today
- Total
꿈꾸는 시스템 디자이너
Flutter 강좌 - [Form] 텍스트필드 값 확인하기 본문
Flutter 강좌 목록 : https://here4you.tistory.com/120
지난 강좌에서는 텍스트필드의 값의 변화를 감지하고 핸들링하는 방법에 대해 알아봤다. 이번 강좌에서는 텍스트필드에 입력된 값을 얻어 그 값을 다이얼로그로 출력하는 방법에 대해 알아본다.
소스코드는 다음과 같다.
import 'package:flutter/material.dart';

void main() => runApp(MyApp());

class MyApp extends StatelessWidget {
  // This widget is the root of your application.
  @override
  Widget build(BuildContext context) {
    return MaterialApp(title: 'Retrieve Text Input', home: MyCustomForm());
  }
}

class MyCustomForm extends StatefulWidget {
  @override
  _MyCustomFormState createState() => _MyCustomFormState();
}

class _MyCustomFormState extends State<MyCustomForm> {
  // TextEditingController 인스턴스를 필드에 저장
  final myController = TextEditingController();

  @override
  void dispose() {
    myController.dispose();
    super.dispose();
  }

  @override
  Widget build(BuildContext context) {
    return Scaffold(
        appBar: AppBar(
          title: Text('Retrive Text Input'),
        ),
        body: Padding(
          padding: const EdgeInsets.all(16.0),
          // 텍스트필드의 controller 항목에 TextEditingController 인스턴스 연결
          child: TextField(
            controller: myController,
          ),
        ),
        floatingActionButton: FloatingActionButton(
          onPressed: () {
            // 버튼이 눌리면 다이얼로그 출력
            return showDialog(
                context: context,
                builder: (context) {
                  return AlertDialog(
                    // myController의 현재 텍스트 값을 컨텐트로 AlertDialog 출력
                    content: Text(myController.text),
                  );
                });
          },
          tooltip: 'Show me the value!',
          child: Icon(Icons.text_fields),
        ));
  }
}
지난 강좌와 코드는 유사하다. TextEditingController의 인스턴스를 필드에 저장하고 그 인스턴스를 텍스트필드의 controller 항목에 부여하고 있다.
FloatingActionButton을 누르면 showDialog 함수에 의해 AlertDialog가 생성되어 출력된다. 이때 다이얼로그의 컨텐트로 myController.text 값이 이용된다.
다시 정리하면 버튼을 누르면 myController의 text 값이 다이얼로그로 출력되는데, myController는 텍스트필드의 controller 항목으로 연결되어 있으므로 텍스트필드에 값이 다이얼로그로 출력되게 된다.
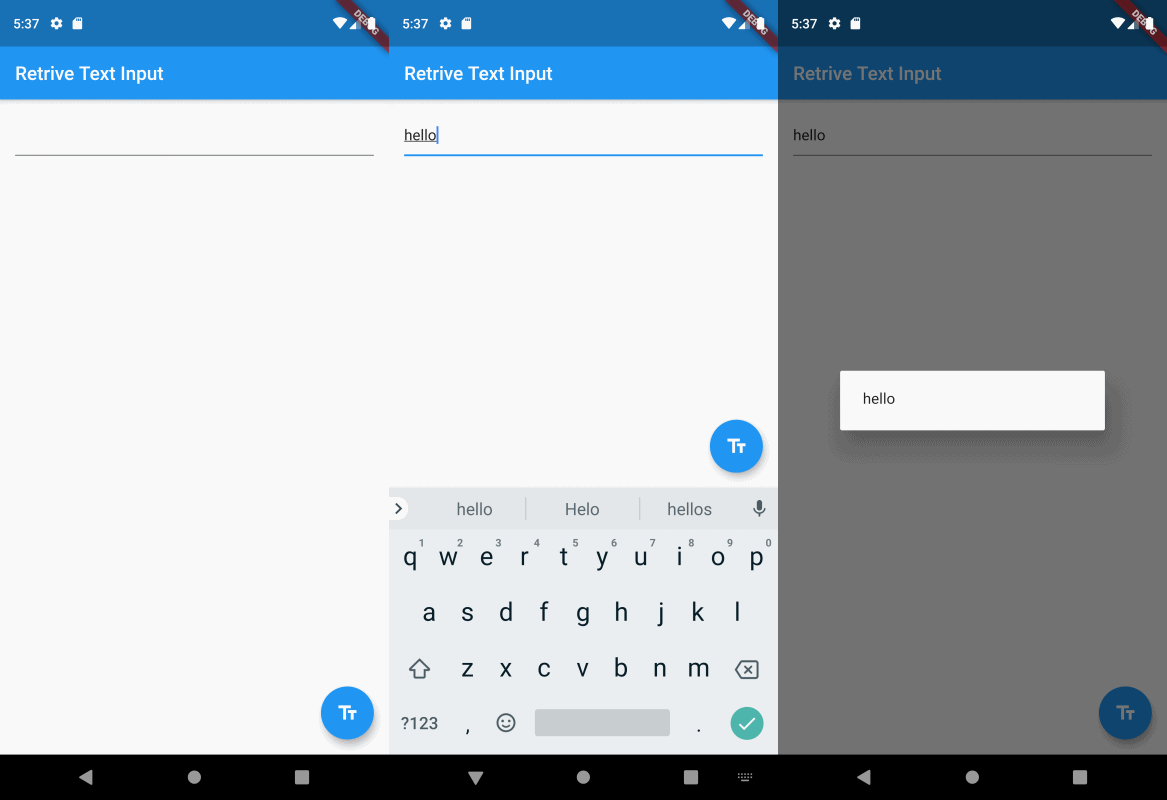
실행 화면은 다음과 같다.

텍스트 필드에 'hello'라고 입력한 후 화면 우측하단에 버튼을 누르면 그 값이 다이얼로그로 출력되는 것을 확인할 수 있다.
본 강좌는 Flutter 공식 사이트의 문서를 참고하여 작성되었습니다.
https://flutter.dev/docs/cookbook/forms/retrieve-input
Retrieve the value of a text field
In this recipe,learn how to retrieve the text a user has entered into a text fieldusing the following steps: 1. Create a `TextEditingController`. 2. Supply the `TextEditingController` to a `TextField`. 3. Display the current value of the text field.## 1. C
flutter.dev
Flutter Code Examples 강좌를 추천합니다.
- 제 블로그에서 Flutter Code Examples 프로젝트를 시작합니다.
- Flutter의 다양한 예제를 소스코드와 실행화면으로 제공합니다.
- 또한 모든 예제는 Flutter Code Examples 앱을 통해 테스트 가능합니다.
Flutter Code Examples 강좌로 메뉴로 이동
Flutter Code Examples 강좌 목록 페이지로 이동
Flutter Code Examples 앱 설치 | Google Play Store로 이동
Flutter Code Examples - Google Play 앱
Are you a beginner at Flutter? Check out the various features of Flutter through the demo. Source code for all demos is also provided.
play.google.com
'Development > Flutter' 카테고리의 다른 글
| Flutter 강좌 - [Gesture] InkWell Vs, GestureDetector (0) | 2019.07.03 |
|---|---|
| Flutter 강좌 - [Gesture] InkWell 위젯 사용법 (0) | 2019.07.03 |
| Flutter 강좌 - [Form] 텍스트필드의 변화를 핸들링하는 방법 (2) | 2019.07.03 |
| Flutter 강좌 - [Form] 텍스트필드에 포커스 주기 (1) | 2019.07.03 |
| Flutter 강좌 - [Form] 텍스트필드 생성 및 스타일 적용 (0) | 2019.07.03 |


