
| 일 | 월 | 화 | 수 | 목 | 금 | 토 |
|---|---|---|---|---|---|---|
| 1 | 2 | 3 | 4 | 5 | 6 | 7 |
| 8 | 9 | 10 | 11 | 12 | 13 | 14 |
| 15 | 16 | 17 | 18 | 19 | 20 | 21 |
| 22 | 23 | 24 | 25 | 26 | 27 | 28 |
| 29 | 30 |
- Hello World
- Flutter 예제
- InkWell
- Image.network
- MainAxisAlignment
- navigator
- Scaffold
- Flutter 강좌
- Snackbar
- 반석천
- FutureBuilder
- node.js
- sqlite
- Flutter 앱 배포
- Flutter Example
- Row Widget
- Column Widget
- ListView.builder
- listview
- Flutter Tutorial
- Cached Image
- ListTile
- HTTP
- Networking
- AppBar
- Row
- flutter
- Load Image
- WillPopScope
- CrossAxisAlignment
- Today
- Total
꿈꾸는 시스템 디자이너
Flutter 강좌 - 플랫폼간 메소드 호출 #4 - Flutter에서 네이티브 API 호출하는 방법 | How to call native APIs in Flutter 본문
Flutter 강좌 - 플랫폼간 메소드 호출 #4 - Flutter에서 네이티브 API 호출하는 방법 | How to call native APIs in Flutter
독행소년 2020. 4. 22. 10:53
Flutter Code Examples 강좌를 추천합니다.
- 제 블로그에서 Flutter Code Examples 프로젝트를 시작합니다.
- Flutter의 다양한 예제를 소스코드와 실행화면으로 제공합니다.
- 또한 모든 예제는 Flutter Code Examples 앱을 통해 테스트 가능합니다.
Flutter Code Examples 강좌로 메뉴로 이동
Flutter Code Examples 강좌 목록 페이지로 이동
Flutter Code Examples 앱 설치 | Google Play Store로 이동
Flutter Code Examples - Google Play 앱
Are you a beginner at Flutter? Check out the various features of Flutter through the demo. Source code for all demos is also provided.
play.google.com
Flutter 강좌 시즌2 목록 : https://here4you.tistory.com/149
이번 강좌에서는 Flutter에서 네이티브 라이브러리를 호출하는 방법에 대해서 알아본다.
이 기법은 복잡하거나 어려운 방법이 아니라 지난 강좌에서 진행한 방법을 단순히 순차적으로 합친 것 뿐이다.
Flutter에서 Android를 호출할 때에는 MethodChannel을 이용하고, Android에서 다시 NDK를 이용해 네이티브 라이브러리를 호출하여 그 결과를 반대 경로로 전달해주는 것 뿐이다.

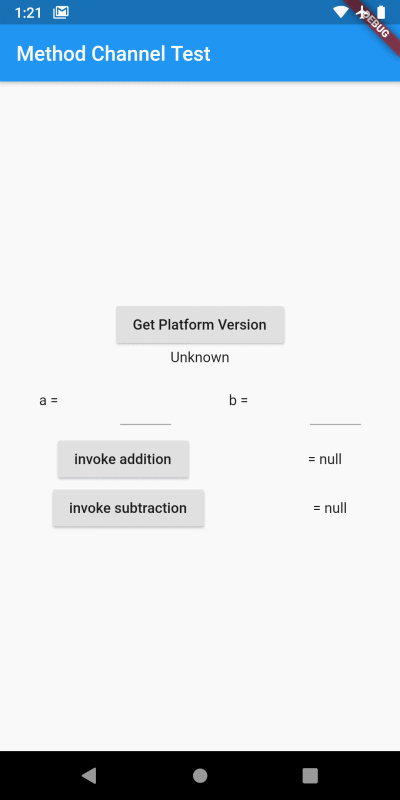
우선 앱을 통해 개발할 기능의 컨셉을 확인해 보자. 지난 강좌의 프로젝트를 이용해서 추가 개발한 것이다.

앱의 실행 화면을 보면, 지난 강좌에서 이용한 MethodChannel을 이용해서 int 타입의 변수 a와 b에 값을 입력하고, 덧셈을 수행하는 addition 메소드와, 뺄셈을 수행하는 subtraction 메소드를 추가로 구현하고 그 결과를 수신해서 화면에 출력하는 앱이다. 그리고 두 메소드의 실제 구현을 C 언어로 작성되어 네이티브 라이브러리로 생성될 것이며, Android의 NDK를 이용해서 호출되는 방식이다.
1. Flutter에서 Android 메소드 호출
메소드 호출의 시작점인 Flutter 단의 main.dart는 다음과 같이 작성한다.
import 'package:flutter/material.dart';
import 'package:flutter/services.dart';

void main() => runApp(MyApp());

class MyApp extends StatelessWidget {
  @override
  Widget build(BuildContext context) {
    return MaterialApp(
      title: 'Method Channel Test',
      theme: ThemeData(
        primarySwatch: Colors.blue,
      ),
      home: MyHomePage(),
    );
  }
}

class MyHomePage extends StatefulWidget {
  @override
  _MyHomePageState createState() => _MyHomePageState();
}

class _MyHomePageState extends State<MyHomePage> {
  static const MethodChannel _channel =
      const MethodChannel('com.example.methodchanneltest');

  String _platformVersion = 'Unknown';

  int a, b;
  int additionResult, subtractionResult;

  Future<String> getPlatformVersion() async {
    final String version = await _channel.invokeMethod('getPlatformVersion');
    return version;
  }

  Future<int> addition(int a, int b) async {
    return await _channel.invokeMethod("addition", <String, dynamic>{
      "a": a,
      "b": b,
    });
  }

  Future<int> subtraction(int a, int b) async {
    return await _channel.invokeMethod("subtraction", <String, dynamic>{
      "a": a,
      "b": b,
    });
  }

  @override
  Widget build(BuildContext context) {
    return Scaffold(
      appBar: AppBar(
        title: Text("Method Channel Test"),
      ),
      body: Center(
        child: Column(
          mainAxisAlignment: MainAxisAlignment.center,
          children: <Widget>[
            RaisedButton(
              child: Text("Get Platform Version"),
              onPressed: () async {
                String result = await getPlatformVersion();
                setState(() {
                  _platformVersion = result;
                });
              },
            ),
            Text(_platformVersion),
            Container(
              margin: const EdgeInsets.symmetric(vertical: 10, horizontal: 10),
              child: Row(
                mainAxisAlignment: MainAxisAlignment.spaceAround,
                children: <Widget>[
                  Text("a = "),
                  Container(
                    width: 50,
                    child: TextField(
                      onChanged: (value) {
                        setState(() {
                          a = int.parse(value);
                        });
                      },
                      textAlign: TextAlign.center,
                    ),
                  ),
                  Text("b = "),
                  Container(
                    width: 50,
                    child: TextField(
                      onChanged: (value) {
                        setState(() {
                          b = int.parse(value);
                        });
                      },
                      textAlign: TextAlign.center,
                    ),
                  )
                ],
              ),
            ),
            Container(
              child: Row(
                mainAxisAlignment: MainAxisAlignment.spaceAround,
                children: <Widget>[
                  RaisedButton(
                    child: Text("invoke addition"),
                    onPressed: () async {
                      int result = await addition(a, b);
                      setState(() {
                        additionResult = result;
                      });
                    },
                  ),
                  Text(" = $additionResult")
                ],
              ),
            ),
            Container(
              child: Row(
                mainAxisAlignment: MainAxisAlignment.spaceAround,
                children: <Widget>[
                  RaisedButton(
                    child: Text("invoke subtraction"),
                    onPressed: () async {
                      int result = await subtraction(a, b);
                      setState(() {
                        subtractionResult = result;
                      });
                    },
                  ),
                  Text(" = $subtractionResult")
                ],
              ),
            )
          ],
        ),
      ),
    );
  }
}
기존에 구현한 getPlatformVersion 메소드 외에 추가로 addition과 subtraction을 하고 이 메소드들을 이용하는 UI 위젯들도 추가했다.
MethodChannel의 인스턴스를 통해 Android 측 메소드를 호출하는 방식은 다음과 같다. 파라미터는 Map 형식으로 입력할 수 있다.
  Future<int> addition(int a, int b) async {
    return await _channel.invokeMethod("addition", <String, dynamic>{
      "a": a,
      "b": b,
    });
  }
2. Android에서 Flutter의 호출 처리
Adnroid 측의 MainActivity는 다음과 같이 작성한다.
package com.example.methodchanneltest;

import android.os.Build;

import androidx.annotation.NonNull;

import io.flutter.embedding.android.FlutterActivity;
import io.flutter.embedding.engine.FlutterEngine;
import io.flutter.plugin.common.MethodChannel;
import io.flutter.plugins.GeneratedPluginRegistrant;

public class MainActivity extends FlutterActivity {

    // load native lib
    static {
        System.loadLibrary("native-lib");
    }

    @Override
    public void configureFlutterEngine(@NonNull FlutterEngine flutterEngine) {
        GeneratedPluginRegistrant.registerWith(flutterEngine);
        final MethodChannel channel = new MethodChannel(flutterEngine.getDartExecutor(), "com.example.methodchanneltest");
        channel.setMethodCallHandler(handler);
    }

    // MethodCallHandler
    private MethodChannel.MethodCallHandler handler = (methodCall, result) -> {
        if (methodCall.method.equals("getPlatformVersion")) {
            result.success("Android Version: " + Build.VERSION.RELEASE);
        } else if (methodCall.method.equals("addition")) {
            result.success(addition(methodCall.argument("a"), methodCall.argument("b")));
        } else if (methodCall.method.equals("subtraction")) {
            result.success(subtraction(methodCall.argument("a"), methodCall.argument("b")));
        } else {
            result.notImplemented();
        }
    };


    // 추가된 네이티브 API
    public native int addition(int a, int b);

    public native int subtraction(int a, int b);
}
우선 기존 MethodCallHandler 처리 로직에 addition과 subtraction에 대한 처리 로직을 추가한다.
Map 형태로 파라미터를 전달하고,아규먼트로 수신하는 방법은 다음과 같다.
- Flutter에서 메소드 호출시 파라미터 전달 방법
  Future<int> addition(int a, int b) async {
    return await _channel.invokeMethod("addition", <String, dynamic>{
      "a": a,
      "b": b,
    });
  }
- Android에서는 메소드 호출 수신시 아규먼트 수신 방법
if (methodCall.method.equals("addition")) {
    int a = methodCall.argument("a");
    int b = methodCall.argument("b");
    result.success(addition(a,b));
}
다음으로는 NDK를 이용하기 위한 구현이다. 소스 상단에 네이티브 라이브러리를 참조하기 위해서 소스 상단에서는 네이티브 라이브러리(native-lib)를 로드한다. 다음으로 네이티브 라이브러를 호출하기 위한 메소드 addtion과 subtraction을 선언한다.
3. 네이티브 라이브러리 추가 구현
android/app/src/main 디렉토리에 cpp 디렉토리를 추가한 후 native-lib.cpp 파일을 생성한 후 다음과 같이 작성한다. 기존 강좌에서 실습한 코드와 동일하나 함수명안에 패키지 이름 부분만 현재 패키지명으로 수정된 것이다.
#include <jni.h>
#include <string>
#include "calculator.cpp"

extern "C" JNIEXPORT jint JNICALL
Java_com_example_methodchanneltest_MainActivity_addition(
        JNIEnv *env,
        jobject /* this */,
        jint a,
        jint b) {

    return addition(a, b);
}

extern "C" JNIEXPORT jint JNICALL
Java_com_example_methodchanneltest_MainActivity_subtraction(
        JNIEnv *env,
        jobject /* this */,
        jint a,
        jint b) {

    return subtraction(a, b);
}
실제 덧셈과 뺄셈을 수행하는 addition 함수와 subtraction 함수를 구현하기 위해 calculator.cpp 파일을 생성한 후 다음과 같이 작성한다. 기존 강좌의 내용과 동일하다.
int addition(int a, int b) {
    return a + b;
}

int subtraction(int a, int b) {
    return a - b;
}
네이티브 라이브러리를 컴파일하기 위한 규칙을 기술하기 위한 CMakeLists.txt 파일을 생성하여 다음과 같이 작성한다. 역시 기존 강좌 내용과 동일하다.
cmake_minimum_required(VERSION 3.4.1)

add_library( # Sets the name of the library.
             native-lib

             # Sets the library as a shared library.
             SHARED

             # Provides a relative path to your source file(s).
             native-lib.cpp )

find_library( # Sets the name of the path variable.
              log-lib

              # Specifies the name of the NDK library that
              # you want CMake to locate.
              log )

target_link_libraries( # Specifies the target library.
                       native-lib

                       # Links the target library to the log library
                       # included in the NDK.
                       ${log-lib} )
마지막으로 네이티브 라이브러리를 빌드하고 앱 프로젝트에 포함되게 하기 위해 android/build.gradle 파일의 android 항목 마지막에 다음의 내용을 추가한다.
    externalNativeBuild {
        cmake {
            path "src/main/cpp/CMakeLists.txt"
            version "3.10.2"
        }
    }
이것으로 구현을 완료되었다. 앱을 실행해서 동작 과정을 다시 테스트해보자.
이번 강좌에서는 Flutter에서 네이티브 라이브러리를 호출하는 방법에 대해서 알아보았다. 이로서 Flutter - Android -C++ 간 자유로운 호출이 가능해졌다.


