| 일 | 월 | 화 | 수 | 목 | 금 | 토 |
|---|---|---|---|---|---|---|
| 1 | 2 | 3 | 4 | 5 | 6 | 7 |
| 8 | 9 | 10 | 11 | 12 | 13 | 14 |
| 15 | 16 | 17 | 18 | 19 | 20 | 21 |
| 22 | 23 | 24 | 25 | 26 | 27 | 28 |
- ListTile
- Row
- Flutter 앱 배포
- FutureBuilder
- Row Widget
- listview
- sqlite
- Flutter Tutorial
- Hello World
- HTTP
- node.js
- navigator
- Networking
- Flutter Example
- Snackbar
- Scaffold
- flutter
- CrossAxisAlignment
- Flutter 강좌
- WillPopScope
- Flutter 예제
- Column Widget
- ListView.builder
- InkWell
- Cached Image
- AppBar
- 반석천
- Load Image
- Image.network
- MainAxisAlignment
- Today
- Total
꿈꾸는 시스템 디자이너
Flutter 강좌 - 플랫폼간 메소드 호출 #1 - 안드로이드에서 네이티브 API 호출 | How to call native API in Android 본문
Flutter 강좌 - 플랫폼간 메소드 호출 #1 - 안드로이드에서 네이티브 API 호출 | How to call native API in Android
독행소년 2020. 4. 20. 11:57
Flutter Code Examples 강좌를 추천합니다.
- 제 블로그에서 Flutter Code Examples 프로젝트를 시작합니다.
- Flutter의 다양한 예제를 소스코드와 실행화면으로 제공합니다.
- 또한 모든 예제는 Flutter Code Examples 앱을 통해 테스트 가능합니다.
Flutter Code Examples 강좌로 메뉴로 이동
Flutter Code Examples 강좌 목록 페이지로 이동
Flutter Code Examples 앱 설치 | Google Play Store로 이동
Flutter Code Examples - Google Play 앱
Are you a beginner at Flutter? Check out the various features of Flutter through the demo. Source code for all demos is also provided.
play.google.com
Flutter 강좌 시즌2 목록 : https://here4you.tistory.com/149
이번 강좌부터는 Flutter에서 네이티브 코드를 사용하는 방법에 대해서 알아본다.
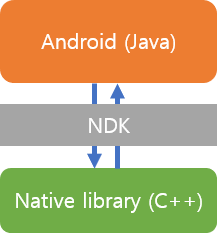
이번 강좌는 첫번째 강좌로, Flutter가 아닌 일반 Android 프로젝트에서 NDK를 이용해서 C/C++ API를 호출하는 방법에 대해서 알아본다.

Android Studio에서 Native C++ 프로젝트를 생성한다.

프로젝트 이름을 설정한다.

기본 툴체인으로 설정하고 Finish를 선택한다.

프로젝트 생성이 완료되면 바로 앱을 실행해 보자.

"Hello from C++"이란 문구가 출력되는 것을 확인할 수 있다. 이 문구는 우리가 작성한 것이 아니라 프로젝트 생성이 자동으로 작성된 코드 템플릿이다. 출력되는 내용으로 짐작하면, 이미 C++로 작성된 API가 호출되어 안드로이드 앱에 출력되고 있는 것으로 보인다.
그럼 소스를 좀 살펴보자.
MainActivity.java의 구현 내용은 다음과 같다.
package com.example.ndk_test;

import androidx.appcompat.app.AppCompatActivity;

import android.os.Bundle;
import android.widget.TextView;

public class MainActivity extends AppCompatActivity {

    // Used to load the 'native-lib' library on application startup.
    static {
        System.loadLibrary("native-lib");
    }

    @Override
    protected void onCreate(Bundle savedInstanceState) {
        super.onCreate(savedInstanceState);
        setContentView(R.layout.activity_main);

        // Example of a call to a native method
        TextView tv = findViewById(R.id.sample_text);
        tv.setText(stringFromJNI());
    }

    /**
     * A native method that is implemented by the 'native-lib' native library,
     * which is packaged with this application.
     */
    public native String stringFromJNI();
}
System.loadLibrary를 이용해서 native-lib라는 네이티브 라이브러를 로딩하였고, stringFromJNI 메소드를 통해 화면에 문구를 출력하고 있다. stringFromJNI 메소드에 native라는 키워드가 붙어있은 것으로 보아 이 메소드가 native-lib 안에 있는 네이티브 API를 호출한 것으로 보인다.
우선 native-lib가 어디 있는지부터 확인해 보자. Android Studio의 워크스페이스를 프로젝트로 변경한 후 app/build/intermediates/cmak/debug/obj 디렉토리의 내용을 확인해 보자.

각 아키텍쳐별로 libnative-lib.so 라는 파일들이 존재한다. 이 so 파일들이 MainActivity.java에서 로드한 native-lib에 해당한다. 상위에 cmake 디렉토리가 존재하는 것으로 보아 camke 툴체인을 이용해서 컴파일된 것으로 유추할 수 있다.
여기서 잠깐 정리하자.
MainActivity에서 사용한 stringFromJNI라는 네이티브 메소드는 cmake 툴체인으로 컴파일된 libnative-lib.so 라이브러리(native-lib) 내부의 API를 호출하고 있다.
그럼 다음으로 libnative-lib.so가 어떻게 생성되었는지 알아보자.

app/src/main 디렉토리를 살펴보면, MainActivity.java 파일이 존재하는 java 디렉토리와 동일한 수준으로 cpp 디렉토리가 존재하고 있고 그 디렉토래내에 native-lib.cpp 파일과 CMakeLists.txt 파일이 존재한다.
native-lib.cpp 파일은 Native C++ 프로젝트 생성 시 자동으로 생성되는 템플릿 코드로 stringFromJNI 함수가 존재한다.
#include <jni.h>
#include <string>

extern "C" JNIEXPORT jstring JNICALL
Java_com_example_ndk_1test_MainActivity_stringFromJNI(
        JNIEnv* env,
        jobject /* this */) {
    std::string hello = "Hello from C++";
    return env->NewStringUTF(hello.c_str());
}
내용을 보면 "Hello from C++" 문자열을 반환하는 기능을 가지고 있다.
함수의 구조를 조금 더 살펴보면,
JIN를 통해 호출되는 함수로 노출하기 위해서는 다음과 같이 함수를 선언한다. JNICALL 키워드 앞에는 리턴타입이 들어간다.
extern "C" JNIEXPORT jstring JNICALL
그리고 함수명은 다음과 같이 선언한다. Java_패키지명_호출하는 Activity명_함수명 형태로 선언한다.
Java_com_example_ndk_1test_MainActivity_stringFromJNI
다음으로 CMakeLists.txt 파일을 살펴보자.
cmake_minimum_required(VERSION 3.4.1)

add_library( # Sets the name of the library.
             native-lib

             # Sets the library as a shared library.
             SHARED

             # Provides a relative path to your source file(s).
             native-lib.cpp )

find_library( # Sets the name of the path variable.
              log-lib

              # Specifies the name of the NDK library that
              # you want CMake to locate.
              log )

target_link_libraries( # Specifies the target library.
                       native-lib

                       # Links the target library to the log library
                       # included in the NDK.
                       ${log-lib} )
add_library 항목을 살펴보면 native-lib.cpp 파일을 공유라이브러리로 설정하고 그 이름을 native-lib로 한다는 내용이다. MainActivity에서 로드한 native-lib가 native-lib.cpp 파일의 컴파일 결과물임을 확인할 수 있다.
여기서도 잠시 정리하자.
MainActivity에서 로그하여 사용한 native-lib라는 라이브러리는 native-lib.cpp 파일의 컴파일 결과물이며, cmake 툴체인을 통해 공유라이브러리형태로 컴파일되고 있다.
자 마지막으로 native-lib 라이브러리가 어떻게 컴파일 되는지 확인해 보자.
app/build.gradle 파일을 살펴보자.
apply plugin: 'com.android.application'

android {
    compileSdkVersion 29


    defaultConfig {
        applicationId "com.example.ndk_test"
        minSdkVersion 21
        targetSdkVersion 29
        versionCode 1
        versionName "1.0"

        testInstrumentationRunner "androidx.test.runner.AndroidJUnitRunner"

        externalNativeBuild {
            cmake {
                cppFlags ""
            }
        }
    }

    buildTypes {
        release {
            minifyEnabled false
            proguardFiles getDefaultProguardFile('proguard-android-optimize.txt'), 'proguard-rules.pro'
        }
    }

    externalNativeBuild {
        cmake {
            path "src/main/cpp/CMakeLists.txt"
            version "3.10.2"
        }
    }
}

dependencies {
    implementation fileTree(dir: 'libs', include: ['*.jar'])

    implementation 'androidx.appcompat:appcompat:1.1.0'
    implementation 'androidx.constraintlayout:constraintlayout:1.1.3'
    testImplementation 'junit:junit:4.12'
    androidTestImplementation 'androidx.test.ext:junit:1.1.1'
    androidTestImplementation 'androidx.test.espresso:espresso-core:3.2.0'
}
app/build.gradle 파일은 안드로이드 프로젝트(Flutter 프로젝트도 동일)를 빌드하는 규칙을 정의하고 있다. 일반적인 안드로이드 프로젝트의 build.gradle 파일과 비교해보면 android 항목 안에 externalNativeBuild 서브 항목이 추가되어 있는 것을 확인할 수 있다.
내용을 살펴보면, src/main/cpp/CMakeLists.txt 파일에 정의된 규칙을 참고해서 외부 네이티브 빌드를 진행하라는 의미 이다.
만약 일반 안드로이드 프로젝트를 개발하던 중 네이티브 코드를 추가하여 네이티브 라이브러리를 이용하고자 않다면, 위에서 살펴본 것 처럼 cpp 디렉토리를 생성하여 cpp파일과 CMakeLists.txt 파일을 추가한 후 build.gradle 파일에 externalNativeBuild 항목을 추가해주면 된다.
이번 강좌에서는 Android Studio에서 제공하는 Native C++ 프로젝트를 통해 NDK를 이용하여 네이티브 라이브러가 호출되는 구조에 대해서 살펴보았다.
다음 강좌에서는 네이티브 API를 추가해 보고, 안드로이드에서 호출하는 방법에 대해서 실습해보도록 한다.


