| 일 | 월 | 화 | 수 | 목 | 금 | 토 |
|---|---|---|---|---|---|---|
| 1 | 2 | 3 | 4 | 5 | 6 | 7 |
| 8 | 9 | 10 | 11 | 12 | 13 | 14 |
| 15 | 16 | 17 | 18 | 19 | 20 | 21 |
| 22 | 23 | 24 | 25 | 26 | 27 | 28 |
- HTTP
- WillPopScope
- InkWell
- Networking
- Scaffold
- sqlite
- Snackbar
- 반석천
- Image.network
- Row
- Flutter 강좌
- Column Widget
- navigator
- FutureBuilder
- MainAxisAlignment
- node.js
- ListView.builder
- Flutter Example
- ListTile
- Flutter 앱 배포
- listview
- Flutter Tutorial
- AppBar
- flutter
- CrossAxisAlignment
- Cached Image
- Flutter 예제
- Row Widget
- Hello World
- Load Image
- Today
- Total
꿈꾸는 시스템 디자이너
Flutter 강좌 - [Firebase] Cloud Functions 사용법 #1 본문
Flutter Code Examples 강좌를 추천합니다.
- 제 블로그에서 Flutter Code Examples 프로젝트를 시작합니다.
- Flutter의 다양한 예제를 소스코드와 실행화면으로 제공합니다.
- 또한 모든 예제는 Flutter Code Examples 앱을 통해 테스트 가능합니다.
Flutter Code Examples 강좌로 메뉴로 이동
Flutter Code Examples 강좌 목록 페이지로 이동
Flutter Code Examples 앱 설치 | Google Play Store로 이동
Flutter Code Examples - Google Play 앱
Are you a beginner at Flutter? Check out the various features of Flutter through the demo. Source code for all demos is also provided.
play.google.com
Flutter 강좌 시즌2 목록 : https://here4you.tistory.com/149
이번 강좌에서는 Firebase의 Cloud Functions에 대해서 알아본다.
Cloud Functions이란 클라우드상에 존재하는 함수란 뜻이다. 함수이므로 어디에 어떻게 존재하든 앱을 개발할 때 로컬에 존재하는 함수처럼 호출할 수 있다는 개념이다.
기존에는 웹 서버를 구축하고 서버 로직을 구현하고, 외부에 노출시킬 서버 로직을 RESTful API로 제공하여 사용해왔다. 결과적으로는 HTTP 프로토콜을 이용해서 request 메시지를 전송하고 response 메시지를 수신하는 방식이었고 이를 위해서는 해당 API의 URL을 알아야만 했다. 하지만 Cloud Functions을 이용하면 함수의 이름만 알면 URL을 이용하지 않고도 서버에 있는 기능을 호출할 수 있다는 것이다.
1. Firebase 설정
Firebase 콘솔에 접속하여 Flutter Firebase 프로젝트로 진입한 후 Functions 메뉴로 진입한다.

시작하기를 선택한다.

함수를 사용하려면 npm과 node.js가 환경으로 설치되어야 하며, 도구인 firebase-tools의 설치가 필요하다고 설명되고 있다.
계속을 선택한다.
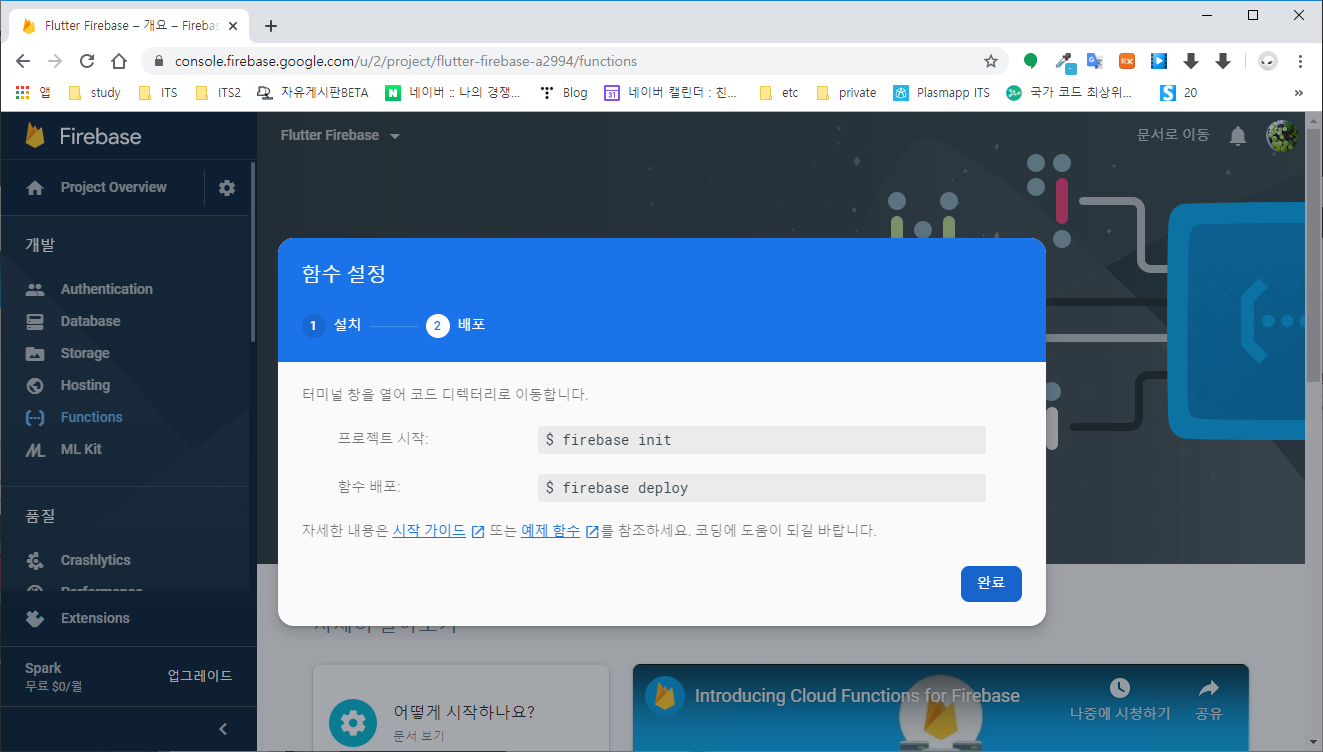
프로젝트 실행 명령과 함수 배포 명령이 소개되고 있다. 완료를 선택한다.
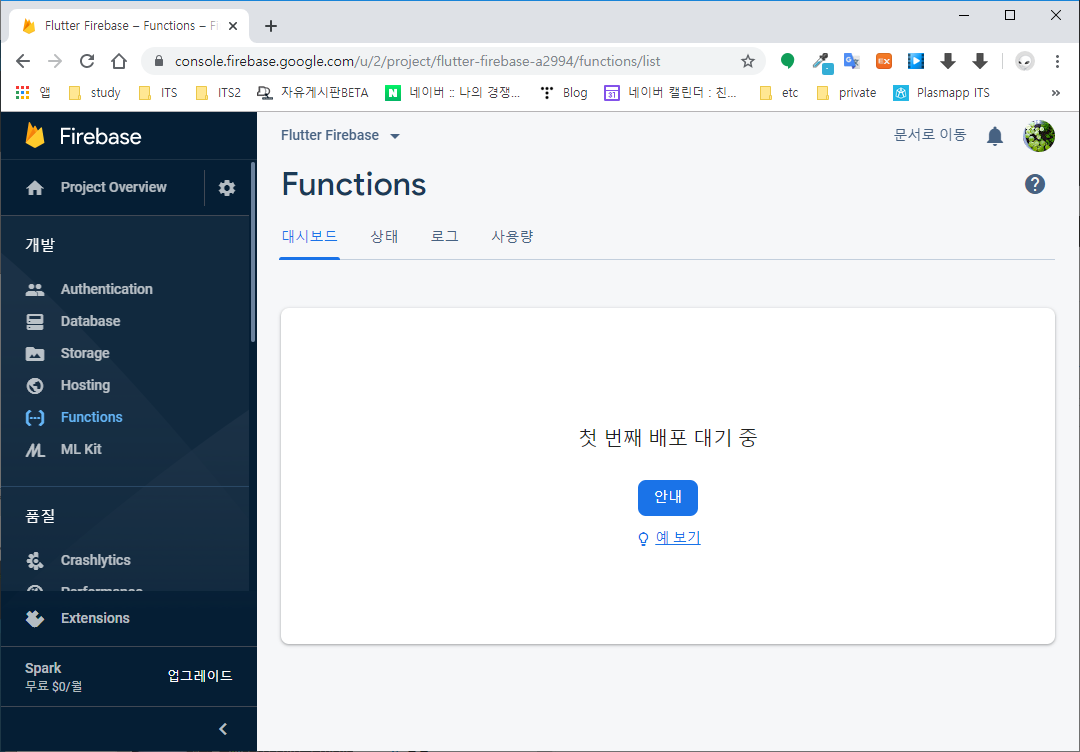
대시보드가 나타난다.
2. 개발환경 설정
로컬 PC에 npm과 node.js 환경을 설치한 후 Firebase 도구를 설치해보자.
$ npm install -g firebase-toolsnpm이 처음인 분들을 위해 짧게 설명하면, npm은 개발에 필요한 라이브러리나 패키지 등을 다운로드해주는 매니저 툴이다. 윈도뿐만 아니라 리눅스와 맥 OS 등에서도 제공된다. 위 명령어의 경우 firebase-tools이라는 Firebase용 SDK를 로컬에 다운로드하라는 의미이며 -g 옵션의 경우 global 하게 설치하라는 의미로 -g로 설치한 라이브러리나 패키지는 다른 프로젝트에서도 이용할 수 있다. 만약 -g 옵션이 없다면 현재 폴더로 해당 라이브러리나 패키지가 다운로드되며 다른 프로젝트에서는 참조될 수 없다.

firebase-tools이 설치되었으므로 프로젝트 시작해보자
$ firebase init
인증이 필요하니 firebase에 먼저 로그인하라는 에러 메시지가 출력된다.
로그인을 해보자
$ firebase login
웹브라우저가 자동으로 실행되면서 Firebase CLI에 계정을 연결이 요청된다. Firebase에 연결된 계정으로 연결을 허용한다.
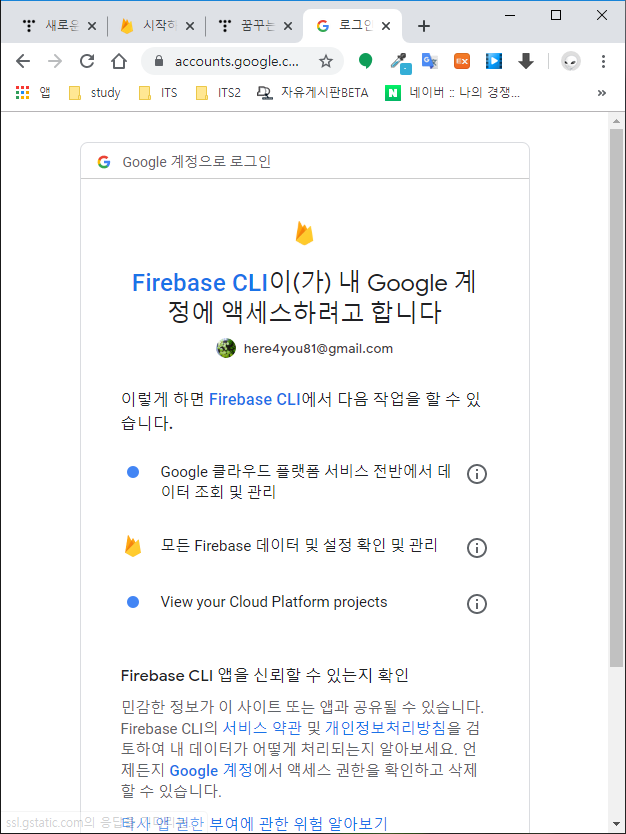
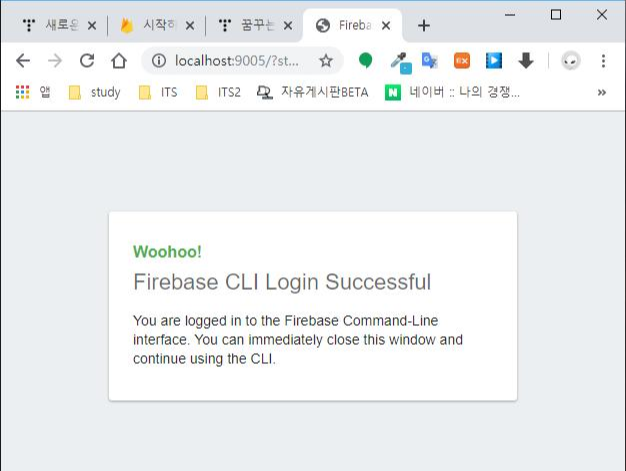
연결을 허용하면 Firebase CLI에 로그인이 성공되었다는 메시지가 출력된다.
터미널 창에서도 구글 계정으로 로그인에 성공되었다는 메시지가 출력된다.

이제 다시 프로젝트를 시작해보자.

Firebase 툴은 프로젝트 생성을 위해 몇 가지는 물어본다.
- 어떤 기능들을 이용할 것인가? -> Functions만 선택함
- 프로젝트를 새롭게 생성할 것인가? -> 존재하는 프로젝트 중 Flutter Firebase 프로젝트를 이용함
- 어떤 언어를 이용할 것인가? -> JavaScript (Node.js)
- ESLint를 이용할 것인가? -> Yes
- Dependencies들을 설치할 것인가? -> Yes
프로젝트 디렉터리의 살펴보자.

Firebase 문서에서는 다음과 같이 설명하고 있다.
myproject
 +- .firebaserc    # Hidden file that helps you quickly switch between
 |                 # projects with `firebase use`
 |
 +- firebase.json  # Describes properties for your project
 |
 +- functions/     # Directory containing all your functions code
      |
      +- .eslintrc.json  # Optional file containing rules for JavaScript linting.
      |
      +- package.json  # npm package file describing your Cloud Functions code
      |
      +- index.js      # main source file for your Cloud Functions code
      |
      +- node_modules/ # directory where your dependencies (declared in
                       # package.json) are installed
우선 package.json 파일의 내용을 살펴보자
{
  "name": "functions",
  "description": "Cloud Functions for Firebase",
  "scripts": {
    "lint": "eslint .",
    "serve": "firebase serve --only functions",
    "shell": "firebase functions:shell",
    "start": "npm run shell",
    "deploy": "firebase deploy --only functions",
    "logs": "firebase functions:log"
  },
  "engines": {
    "node": "8"
  },
  "dependencies": {
    "firebase-admin": "^8.6.0",
    "firebase-functions": "^3.3.0"
  },
  "devDependencies": {
    "eslint": "^5.12.0",
    "eslint-plugin-promise": "^4.0.1",
    "firebase-functions-test": "^0.1.6"
  },
  "private": true
}
프로젝트에 대한 설명과 사용할 엔진(node.js 버전), 프로젝트 실행에 필요한 라이브러리(dependencies), 개발에 필요한 라이브러리(devDependencies) 등에 대해 설명하고 있다.
node_module 디렉터리의 내용을 살펴보자.
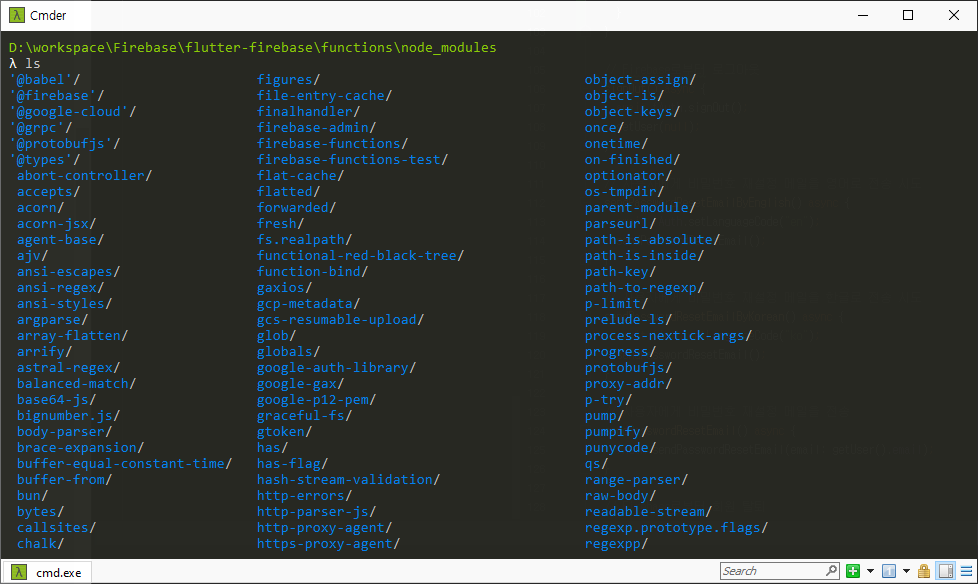
프로젝트 개발과 실행에 필요한 라이브러리와 패키지들이 다수 존재한다. 용량만도 50메가가 넘는다.
이번 강좌와는 무관하지만 npm 개발에 관해서 한 가지만 소개한다. 앞 서 npm의 경우 프로젝트 개발에 필요한 라이브러리들을 설치하는 툴이라고 소개했다. 이렇게 라이브러리들을 설치할 때 package.json 파일을 함께 사용하면 큰 장점이 발생한다. package.json 파일 내부에는 프로젝트에서 참조하는 라이브러리들의 정보가 기술되어 있다. 그래서 npm install 명령어로 프로젝트를 설치하면 json 파일에 기술된 라이브러리들이 자동으로 설치된다.
예를 들어 프로젝트를 배포하거나 다른 개발자에게 공유할 때 라이브러리(node_module)들까지 함께 전달하지 않고 소스코드와 package.json 파일만 전달하면 npm install 명령어로 필요한 라이브러리들을 설치할 수 있게 된다.
다음으로 index.js 파일의 내용을 살펴보자.

index.js 파일은 Cloud Functions 코드의 메일 소스 파일이다. 현재는 firebase-functions 라이브러리를 import(require)해서 functions로 할당하는 내용만이 존재한다.
파일 하단분의 helloWorld 함수의 주석을 제거해보자.
const functions = require('firebase-functions');

// // Create and Deploy Your First Cloud Functions
// // https://firebase.google.com/docs/functions/write-firebase-functions
//
exports.helloWorld = functions.https.onRequest((request, response) => {
  response.send("Hello from Firebase!");
});
파일을 저장하고 함수를 배포해 본다.
$ firebase deploy --only functions
helloWorld 함수가 Firebase로 배포(업로드)되고 다음의 URL로 할당되었다.
https://us-central1-flutter-firebase-a2994.cloudfunctions.net/helloWorld
Firebase 콘솔에서도 함수가 추가된 것을 확인할 수 있다.
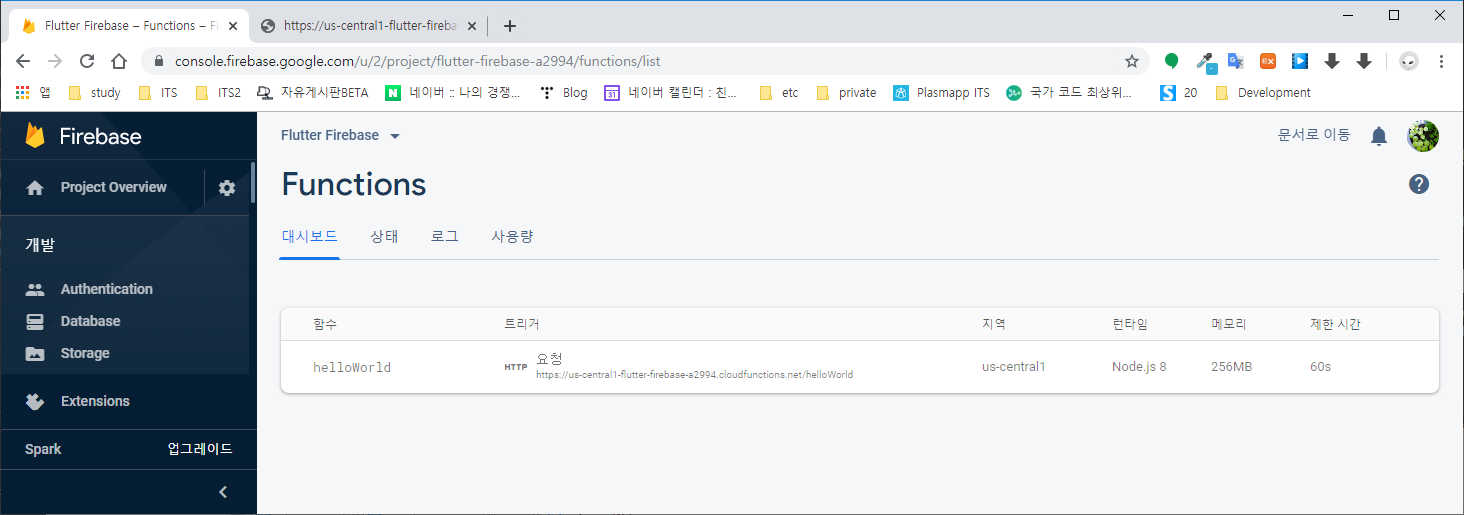
웹브라우저를 통해 위의 URL로 접속해보면 정상적으로 메시지가 반환되는 것을 확인할 수 있다.

3. Flutter Firebase 앱을 통한 테스트
이전 강좌에서 사용하던 Flutter Firebase 앱을 이용해서 간단하게 Scaffold를 하나 구현해보자
import 'package:flutter/material.dart';
import 'package:http/http.dart' as http;

CloudFunctionsHelloWorldState pageState;

class CloudFunctionsHelloWorld extends StatefulWidget {
  @override
  CloudFunctionsHelloWorldState createState() {
    pageState = CloudFunctionsHelloWorldState();
    return pageState;
  }
}

class CloudFunctionsHelloWorldState extends State<CloudFunctionsHelloWorld> {
  String resp = "";

  @override
  Widget build(BuildContext context) {
    return Scaffold(
      appBar: AppBar(title: Text("Cloud Functions HelloWorld")),
      body: Center(
        child: Column(
          mainAxisAlignment: MainAxisAlignment.center,
          children: <Widget>[
            Text(resp),
            RaisedButton(
              child: Text("Call Cloud Function HelloWorld"),
              onPressed: () async {
                setState(() {
                  resp = "";
                });
                String url =
                    "https://us-central1-flutter-firebase-a2994.cloudfunctions.net/helloWorld";
                var response = await http.get(url);
                setState(() {
                  resp = response.body;
                });
              },
            )
          ],
        ),
      ),
    );
  }
}
http 플러그인을 이용해서 helloWorld 함수의 URL을 get 메서드를 요청한 후 Text 위젯에 출력하는 방식이다.
실행 화면은 다음과 같다. 웹브라우저와 동일하게 Firebase로부터 메시지를 응답받아 출력된다.
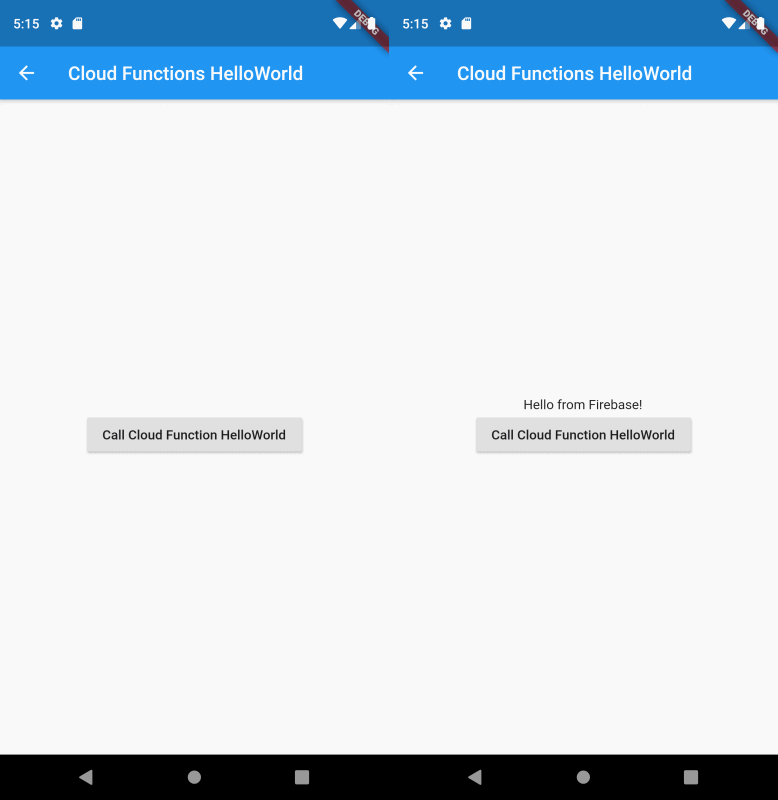
이번 강좌에서는 Firebase Cloud Functions을 개발/배포하고 웹브라우저와 앱을 통해 Function에 접근하는 방법에 대해서 알아봤다.
다음 강좌에서는 Flutter Firebase 앱에서 URL 주소를 이용하지 않고 함수 호출 방식으로 Cloud Functions을 호출하는 방법에 대해서 알아본다.
'Development > Flutter' 카테고리의 다른 글
| Flutter 강좌 - [Firebase] Firestore 사용법 #1 (8) | 2019.11.14 |
|---|---|
| Flutter 강좌 - [Firebase] Cloud Functions 사용법 #2 (2) | 2019.11.13 |
| Flutter 강좌 - [Firebase] 구글 계정으로 Fireabse 로그인(Sign In) (1) | 2019.11.11 |
| Flutter 강좌 - [Firebase] 이메일을 이용한 Firebase 인증(Authentication) 방법 (14) | 2019.11.11 |
| Flutter 강좌 - [Firebase] 구글 로그인(Google Sign in) 사용법 (2) | 2019.11.04 |


